Tuesday, November 25, 2008

Thankful Card

My entry into a Thanksgiving Day Card Contest:


This design is called a Joy Fold Card.


Pumpkin and Leaves Die Cuts are from the Sizzix Originals. Circle and Scallop Punches from Marvy. Rub on letters for "thankful" are from Making Memories. Cardstock is open stock from Die Cuts with a View, ProvoCraft, Creative Memories, Colorbok, and misc. other paper scraps from other projects. I used Scotch Brand double sided tape and a glue stick. Inks where Colorbox Cat Eyes and Tim Holtz Distress Inks."


Closed card front view:


Open Card Inside View:


Open Card View of back and front flap:


Thankful Card

Saturday, November 22, 2008

Joy Fold Card

My First JOY FOLD CARD for a friend's birthday:


Closed view from the front.


Inside view.


Open - Complete Outside view.


And again, the closed version.


Here is my first attempt at a joy fold card. I am really, REALLY happy with the results!

Let me know what you think.

Laura

Sunday, October 19, 2008

Spellbinders Tutorial

Do you ever wonder if you can use a Spellbinders die with your current die cutting machine? I know I have! Here is a great tutorial that was posted on one of my scrapbooking lists. I am sure other can gain some information.

Spellbinders Universal Dies Compatibility

Spellbinders Dies are designed around the Wizard® Embossing & Die
Cutting System and Xcalibur™ Motorized Cutting & Embossing Machine.
However, it has been found that they do have limited compatibility
with other systems.

CuttleBug™ by Provocraft®
This machine is capable of cutting and embossing any Spellbinders
Die. You will need Spellbinders Tan Embossing Mat to emboss in
CuttleBug™ machine.

Cutting Sandwich - stack from bottom up
A Plate
C Plate
Spellbinders Die (cutting side up) that means the side with the
ridges
paper or card stock
B Plate
Run through CuttleBug™ machine

Embossing Sandwich - stack from bottom up
*Remove C Plate for embossing sandwich
Place A Plate on bottom
Leave die face up on A plate with die cut still in the die.
Place one Spellbinders Tan Embossing Mat on top of the die.
Use 2 or 3 pieces of card stock to shim.

*Cautionary note: using more than 3 pieces of card stock to shim
CuttleBug Embossing sandwich will result in B Plate breakage.
When using Spellbinders Edgeabilities card making dies, shim with
only 2 pieces of card stock.

Place two acrylic B Plates on top of sandwich and run through
CuttleBug machine to emboss Spellbinders die cuts.
Turn die over and use like a stencil with inks and chalks for added
detail.

Big Shot™ by Ellison Design® (Blue)
This machine is capable of cutting and embossing any Spellbinders
Die. You will need Spellbinders White Spacer Plate and Tan Embossing
Mat to cut & emboss in the Big Shot Machine.

Cutting Sandwich - stack from bottom up
Place the Big Shots™ thick white mat down first.
Place one Spellbinders White Spacer Plate onto the thick white mat.
Place Spellbinders Die, cutting side up (that would mean the side
with the ridges) onto the white space plate.
Place paper over die.
Plate two Big Shot acrylic mats over paper and roll thru the Big
Shots™ machine.

Embossing Sandwich - stack from bottom up
Remove the Spellbinders Spacer Plate while leaving the die in place.
Place Spellbinders Tan Embossing Mat over the paper and die.
Place one Big Shot acrylic mat on top of Tan Embossing Mat and roll
thru Big Shot™ machine.
Turn die over and use like a stencil with inks & chalks for added
detail.

Big Shot™ by Ellison-Sizzix® (Black & Pink)
Big Kick™ by Sizzix®
This machine is capable of cutting & embossing any Spellbinders Die.
You will need Spellbinders two Tan Embossing Mats to cut and emboss
in the Big Shot™ machine.

Cutting Sandwich - sack from bottom up
Place large platform down first with all tabs closed.
Place Spellbinders die dace up, that would mean ridges or bumpy side
up.
Place card stock on Spellbinders die.
Place two Big Shot™ acrylic mats on top of card stock.
Roll through Big Shot™ machine to die cut shape.

Embossing Sandwich - stack from bottom up
After cutting, remove acrylic mats from card stock and die. Leave the
Spellbinders die in place with paper die cut out still in the die on
the multi-purpose platform.
Plate TWO Spellbinders Tan Embossing Mats on top of die.
With one piece of 12" x 6" card stock tri-fold for a shim and place
on top of the Tan Embossing Mats.
Place ONE Big Shot™ acrylic plate on top and run thru the Big Shot™
machine.

*NOTE: This sandwich combination used to cut and emboss Spellbinders
Dies in the black & pink Big Shot™ may also be used in the Big Kick™
by Sizzix.®

Zip'eMate™ by Accucut®
This machine is capable of cutting and embossing any Spellbinders Die.
Use a Spellbinders Die in the ZEM:

Place a Spellbinders Die on ZEM'S platform, blade side up.
Place paper over die and cut in the same manner as with Zip'eCuts.
After cut, do not remove the die or the paper from the platform.
Place ZEM's Embossing Foam over paper and with the ZEM's Embossing
Mat, roll through again to emboss the die-cut.

Original Sizzix® Press
Ellison® manufactures the Sizzix® System Converter. You will need to
use the system converter along with Spellbinders Spacer Plate and Tan
Embossing Mat to cut and emboss Spellbinders Dies.

Cut Spellbinders Dies in the Sizzix® Machine
Place the Sizzix® System Converter into the Sizzix® Machine.
On the Cutting Pad, place paper to be cut, then Spellbinders Die,
ridges down.
Place the Spellbinders Spacer Place over the Spellbinders Die.
Use a 12" x 6" piece of card stock and trifold to use as a shim.
Place ship on top of Spellbinders Spacer Plate.
Push through Sizzix® Machine to cut.

Emboss Spellbinders in the Sizzix Machine:
After cutting Die in Sizzix® Machine, remove paper shim and spacer
plate.
Leave paper die cut in the die.
Turn over Spellbinders Tan Embossing Mat on top of Spellbinders Die.
Place paper shim on top of Tan Embossing Mat.
Push through Sizzix® Machine to emboss the Spellbinders Die.

NOTE: It may take several presses to cut larger Spellbinders Dies.

Revolution™ by QuicKutz®
This machine may be used to cut and emboss Spellbinders dies.

Cutting with Spellbinder Dies:
Place die onto Revolution™ platform (cut side up).
Place paper or card stock on top of die.
Place acrylic cutting mat on top of die.
Roll through Revolution™ machine.

Embossing with Spellbinder Dies:
Remove acrylic cutting mat.
Leave die in place with die cut still inside.
Place Spellbinders Tan Embossing Pad on top of die.
Place Acrylic embossing mat on top of tan pad.
Roll through Revolution™ machine.

Wednesday, October 15, 2008

Winter Card Swap:

I have been very busy today. Tonight is my last night home, so I decided to make the most of it. I handcrafted 16 holiday/Christmas cards this evening.


Below are my resutls:


Monday, October 13, 2008

Shrink Plastic Ideas

I found this wonderful article on shrink plastic. For those of us who love a bargain, check out the idea of reusing deli plastic containers!

~*~ Courtesy of : artfuncheap.com

For art fun cheap, we like to find, salvage, and experiment with the commercial shrink plastics that you can often get for free. The more you look around, the more you will find examples of heavy shrink plastic that is used commercially and then discarded. Often you can save the plastic, decorate it, and reshrink it.

You can find many products, sometimes for free, that are actually made of or packed in shrinkable plastic. Always check the recycle mark on plastic containers. (Remember the deli container lid that started it all.)

Check the plastic containers in your pantry and at the grocery store, especially picnic supplies. If the number in the center of the mark is a 6 (in the U.S., at least), you should be able to safely shrink it with a heat gun or in an oven.

The mark in the picture below is a 5. That means it is not shrink plastic, so don’t heat it!

Recycle mark on bottom of cup. Oops! This is a 5, so don't shrink it!

How to Shrink Plastic

To safely and evenly shrink plastic, you can use your kitchen oven. Put the pieces on a cookie sheet lined with aluminum foil. The smoother the surface, the more evenly the plastic will shrink; so place the foil shiny side up.

Or you can use the kind of heat gun that rubberstampers and other hobbyists use to activate embossing powder. Those are just the right temperature. You can buy them in hobby stores such as Michael’s and Hobby Lobby, and sometimes other places. The price ranges from about $10 to $20 in the U.S.

Caution: Always be careful. Work in a well-ventilated area. Do not overheat. If you smell anything, if your eyes water, or if you notice anything odd, stop. Never try to shrink any plastic you can’t identify. Even fumes you can’t smell could cause long-term damage. Never heat Styrofoam!

Clear Shrink Plastic

As mentioned earlier, the tops of many deli containers are Type 6 plastic, which you can use as shrink plastic. So are some of the large, clear clamshell containers that deli sandwiches come in.

Most embossed features, like the recycle mark and any borders, will shrink out, so experiment and see what you can do. After all, it’s free.

Some clear drink cups sold in grocery stores are also shrinkable plastic. After a party or picnic, you can wash them and use them for shrink plastic.

However, because of the way they are stretched into cup shape, they will shrink drastically in the vertical direction and only a little horizontally. If you plan ahead, you can use that as a special effect, but don’t plan on using the cups as you would regular, flat shrink plastic.

Stained Glass Colors

Many stores sell Type 6 plastic cups in transparent colors: pink and blue all year ‘round, and red and green around Christmas.

Colored plastic cups made of shrinkable plastic

It is worth figuring out how to deal with the uneven way the cups shrink, because their deep, rich, stained-glass-like colors make wonderful embellishments for paper arts or beads for jewelry-making. They can be used in assemblages or attached to canvas in acrylic paintings.

I recently found a package gorgeous purple shrinkable cups at a dollar store. They also had other colors, such as blue and green. Always check the Recycle mark, however, before shrinking.

Solid Colors

Solid color cups made of Type 6 (shrinkable) plastic are sold in many grocery, drug, and discount stores. I haven’t tried the solids yet, but they are basically painted opaque white shrink plastic, so they should work.

Preparing Cups for Shrinking

Here is how I prepare shrinkable plastic cups for shrinking into a flower shape:

1. Use kitchen shears or other strong scissors to cut the cups vertically from top to bottom.

2. Cut the ends into a rounded shape, cutting off the rolled edge. They should then look like this:

Plastic cups cut from top to bottom, with the cut ends rounded off.

3. Be sure to trim off any splinters, such as the one shown in the picture below.

This splinter, created while cutting the cup before shrinking, should be trimmed off.

While soft and harmless when cut, they can be hard and sharp after shrinking. It is best to get rid of any sharp points before you shrink.

4. For some purposes, such as assemblage, you may want to punch one or more holes in the round center, which was the bottom of the cup, or in one or more of the “petals.” I recommend using a strong, cheap 1/4-inch metal hole punch. It will take some strength.

Note: To sharpen the punch, use it to punch holes in aluminum foil first.

4. Use a heat gum carefully. Do not get it too close to the shrink plastic or any other plastic surface, such as carpet, that can melt. (Ask me how I know this!)

Note: If you have some metal kitchen tongs or insulated tweezers from a tool kit, it’s easier to hold the plastic without burning yourself. Or you can shrink it on a cookie sheet (covered with a sheet of aluminum foil) in the kitchen oven.

Here is a scan of some cups that I shrank hurriedly to illustrate this post. I have had better results in the past.

Three plastic cups, shrunken with a heat gun.

My current scanner has a very shallow depth of field, so only the parts of each cup that actually touched the glass scanner bed are in focus. Still, you can see the effect.

When you shrink cups in the oven, the shapes should shrink very flat. Remember, that you can always reheat and reshape shrink plastic even after it has been shrunk.

5. Some artists use wooden spheres, wooden eggs, and other shapes from hobby stores to shape the heated plastic. You can also use a block of wood to flatten shapes while they are hot.

Note: The purple cup turned out to be Recycle 5, but I tried shrinking it anyway. It did not so much shrink, as shrivel. But I think it is interesting and could be used in a mixed-media painting or an assemblage. I would NOT recommend heating any plastic that is not labled Recycle 6, however, especially in your cooking oven. Who knows what toxic gases I released by shrinking that cup?

Making Shrink-Plastic Leaves

One of the amusing things about shrinking plastic cups is how much they shrink vertically. Instead of cutting petal shapes, you can cut out long slender leaves (like willow leaves), running from top to bottom of the sides of the cup. When you shrink them, they become round, fat leaves, because they shrink only in length.

Have Fun Shrinking Plastic…and Let Us Know What You Discover

Chocolates Box


Wow! I just love this idea posted on another blog. Click the picture to see the steps to this project. It is amazing! What a great idea for Christmas, Valentine's Day or a birthday! Design and copyright by Claudia Rosa, but she does share her step-by-step instructions on her blog.

Saturday, October 11, 2008

Football Swap

Let me know what you think so far. I have two more to make. One Raiders Player and One Jets Player.


Well, I thought I only had two more to do, but one more person joined the swap so I did another three players.


I am working on a Football Swap for a scrapbook list I belong to and I am making paper pieced football players.

Attaching Buttons to a Layout or Card

A question was posed today on one of my scrapbook lists asking the best way to attach buttons to your layouts or cards.

If you want the true sewn on button, you can pierce the paper with the needle and then sew your button onto your layout or card. The problem I see with this is the greater possibility of your page actually ripping over time.

I personally suggest putting your threads on your button, and the attach it to your layout using one of the following:

Glue dots
Embellishment Adhesive (Making Memories or Pioneer make embellishment adhesives)
Diamond Glaze
Beacon 3-in-1 glue
Aleen's, Martha Stewart, JoAnns or any brand of Tacky Glue

While this is not an ll inclusive list of adhesive methods, it does give you ideas on how to add buttons safely to your paper crafts!

Keep on Crafting!

Friday, October 10, 2008

2009 Calendar Templates

Since we are all starting to think about Christmas and making family calendars, here is a link to a freebie calendar print out. It is landscape and uses 2 standard sheets of 8.5 x 11 paper.

Enjoy ladies!


Calendar Template

Dog Swap Items

For this swap I made peek-a-boo tear dogs and stamped images - pictured here.


I also made frames, and then didn't like what I made so....see next picture,


So I made some more frames, and some new stamped images on die cuts.


I hope my fellow swappers enjoy my work.

~have a great day!

Thursday, October 09, 2008

Difficulty with Acrylic Stamps?

Are you having a hard time getting a good image with your acrylic stamps?

Here are a few suggestions for better images:

Try cleaning the stamp with alcohol, then loading it up - really loading
it, putting your card stock on a hard flat surface and redoing the stamp.
Acrylic stamps do not like uneven surfaces, and while they look inked
then will come out "faded" if not really loaded. Hope this helps. - Renee

Maybe try your mouse pad flipped over to the softer side under the image. Some stamps come with a little cushion thingy (sorry for lack of technical term) to put under the paper you are stamping on. This has worked for me. - Micky

and from me:

Take a regular old pencil eraser and erase over the stamp image. Sometimes the clear stamps don't hold ink well. See if that helps to get the ink to stick to your stamp. Clean it really good after you rub it with the eraser and try again.

Christmas Organizer

Christmas Pocket Planner/Organizer:


(Sample made by Nicole in Texas ~not my work)


Christmas Pocket Planner:


Have old file folders laying around the house and you want to make a great little Christmas gift?

Grab your old file folders, Christmas paper leftovers, and any bling, stickers, ribbon and other embellishments you wish you use up!

This is a great project for those hard to buy for folks~

Check out the video and start scrapping away!

World Card Making Day


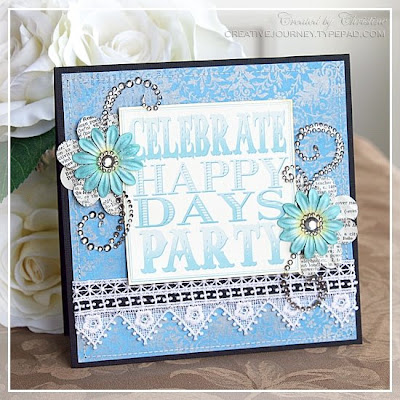
Wow! There are some talented people in this world! For world card making day, a website was set up for people to share their creations! It is amazing! The card shown is not my creation, but was done by Christine - her blog at typepad is noted on the picture.

If you are looking for greeting card ideas, check this link out!

http://www.worldcardmakingday.com/share/


It continues to grow! There are pages and pages of beautiful cards! I am sure you will find something to inspire you!


Enjoy!

Wednesday, October 08, 2008

Altered CD's

I decided to try my hand at altering cd's~

Here are my first attempts:


Let me know what you think~

Distressing Techniques

Here is a great list, too:

Don't you love it when you look at a page and it just looks perfectly finished? I decided to look through many of my past layouts this week. I found that the pages I love the best are the ones that look "finished". They all just have the final touch that says, "I'm done!" And you know what many of mine had in common? They all had some form of distressing involved in the process.

Distressing seems like maybe a new trend, but it is a new trend based on the past --which is what our photos are all about. There are several ways to achieve a distressed look on your existing patterned paper, cardstock, photos, embellishments, and more. I would like to challenge you to try a new one this week from my list below.

1.) Sandpaper: Gently sand the edges or areas you want to look more antique. If you have never done it before, all you really need is a nail file (emery board) or small piece of sand paper. I actually buy large packs of sand paper at the store for furniture projects and I use the left over pieces for distressing. Keep in mind that you can do this to any paper or embellishment or even the photos themselves. Use it on embellishments that you don't use or like the color of - like colored brads or eyelets - this exposes the metal underneath.

2.) Wrinkle and Crinkle: You can wrinkle and crinkle dry papers and cardstocks with no cost at all. I like to wrinkle them, ink them lightly or heavily (you can really use any color of ink - I like the browns and blacks or distressing inks), making sure your ink pad just grazes the raised surfaces of the paper, and then spray them with a fine mist of water to spread the ink and help it to blend into the texture of the paper. Allow to dry completely before using. Iron flat on backside of paper on low heat, if needed.

3.) Steel Wool: This is kind of the same idea as the sand paper, but it works a lot better for distressing embellishments and photos. You just rub the steel wool across the desired areas to get the effect you want.

4.) Tea or Coffee Staining: Make yourself a cup of regular tea and use the wet tea bag to stain your paper. Lightly dab the paper until it reaches the shade you wish your paper to be. Blow-dry the paper and you're good to go! For coffee, you can just soak paper in the coffee. Pour coffee into a cake pan and gently lay the paper flat. Soak a minute and take out. Or you can crumple it into the coffee cup and carefully lay it flat afterward. Rubbing dry or damp coffee grounds onto crinkled paper works well too. You can also distress items with colored chalks, colored pencils, ink pens, and household items, such as strawberry/apple juice, and much more.

5.) Tearing & Curling: Yep, tearing is another way to get that distressed look. To make a more "real" look, try tearing the paper and then inking the edges. To get the rolled look: just moisten your fingers with water and roll the edges in the direction you want them to go, then let them dry. This is a fantastic way to add texture.

6.) Paint: Craft paint seems to be coming back, but full circle. Use the paint just like you would distressing inks. Use a brush, sponge or piece of cloth to apply.

If want to make distressing easier, Making Memories sells a kit with almost all of the supplies for the above ideas all in one. Make your layouts shabby chic or get an aged/weathered/heritage style. By distressing your scrapbooking endeavors, you will get that "finished" look.

By R. M. King


Tussie Mussie Instructions

Tussie Mussie Flower guide and instrustions:


With Credit to: By GERALDINE ADAMICH LAUFER


ANGELICA
inspiration

ARTEMISIA
power, dignity, silver moonlight, sentimental recollections, unceasing remembrance

BASIL
love, betrothal, best wishes, ­hatred

BAY LAUREL
success, personal accomplishment, glory, achievement in the arts, reward of merit

bee balm
compassion, sweet virtues, your whims are unbearable

BORAGE
courage, bluntness, directness

BOX
stoicism

BROOM
humility

BUGLE
cheer, most lovable

BURNET, SALAD
a merry heart, joy

CALENDULA
health, joy, remembrance, ­constancy, the sun, affection, disquietude, grief, jealousy,­ ­­
misery, cares
caraway
for prevention of infidelity

CHAMOMILE
energy in adversity, comfort, patience, help against ­wearisomeness, plant physician

CLOVER
good luck, good education, hard work, industry

COLTSFOOT
justice shall be done you

COMFREY
home sweet home

CONEFLOWER, PURPLE
skill, capability

DILL
irresistible, soothing

DITTANY
birth

DOCK
patience

FENNEL
worthy of all praise, force, strength, thinness

FEVERFEW
good health, warmth, you light up my life

FORGET-ME-NOT
true love, hope, remembrance, do not forget me

FOXGLOVE
insincerity, a wish, decision, I am not ambitious for myself but for you

GARLIC
protection, strength, courage, good luck

GERANIUM, SCENTED
preference, gentility, comfort

GINGER
safe, pleasant, comforting, warming

HOPS
mirth, rest, sleep, beer

HYSSOP
cleansing

JOHNNY-JUMP-UP
happy thoughts

LAMB’S-EARS
support, softness, gentleness

LAVENDER
devotion, luck, success, ­happiness, distrust, soothing the passions of the heart, ardent attachment

LEMON BALM
sharp wit, understanding, healing, love, fun, relief, rejuvenation, sympathy, social inter course

LEMON VERBENA
attractive to the opposite sex, responsibility

LOVAGE
strength

MINT
warmth of feeling

MINT, LEMON
virtue, homeyness, cheerfulness

MINT, PINEAPPLE
hospitality, welcome

MUGWORT
travel, to overcome fatigue, ­conception, comfort, be not weary

MYRTLE
marriage, love, married bliss, fidelity, passion, peace, home, joy

NASTURTIUM
patriotism

NETTLE
cruelty, slander

NIGELLA
perplexity, embarrassment, ­independence, prosperity, kiss me twice before I rise

PARSLEY
festivity, feasting, thanks, ­gratitude, useful knowledge

PENNYROYAL
flee

PEPPERMINT
warmth, cordiality

PERILLA
role reversal

PINKS
lively and pure affection, ­fascination, sweetness, boldness, newlyweds, dignity, taste

POPPY
forgetfulness, sleep, oblivion, evanescent pleasure

ROSEMARY
remembrance, devotion, fidelity, wisdom, good luck in the new year, your presence revives me

SAGE
domestic virtue, wisdom, skill, esteem, to mitigate grief

SAGE, JERUSALEM
pride of ownership, earthly ­delights

SAGE, PINEAPPLE
hospitality, esteem, virtue

SAGE,PURPLE-LEAVED
gratitude

SANTOLINA
aggressiveness, pursuit wards off evil

SAVORY
mental powers

SOAPWORT
cleanliness

SORREL
parental affection, joy

SOUTHERNWOOD
jest, bantering

SPEARMINT
warmth of sentiment

STATICE
never-ceasing remembrance

SWEET CICELY
gladness, sincerity, rejoicing, comfort

SWEET MARJORAM
blushes, mirth, consolation, joy, happiness, kindness, courtesy, distrust

SWEET WOODRUFF
eternal life and rejoicing, cordiality, athletic victory

TANSY
hope against miscarriage, I ­declare against you

THYME
activity, bravery, courage, strength, manger herb

VALERIAN
accommodating disposition, drunk and blousy

VERVAIN
good fortune, wishes granted

VIOLET
modesty, faithfulness, humility, simplicity, loyalty, I return your love

WORMWOOD
affection, absence, bitterness, protection for travelers

YARROW
health, to dispel melancholy and heartache, sorrow, healing of wounds, war


NO-MUSS TUSSIE-MUSSIES

Step by step

Materials

Fresh roses, herbs, other flowers, and leaves
Waxed floral tape
Pruning shears or scissors
1 finger cut from a cotton-knit glove
Tapestry needle
Elastic thread
2/3 yard 3-inch-wide lace
1 yard double-sided satin ribbon about 1/2 inch wide to match or complement one of the flower colors

2. Trim all the stems to 5 to 6 inches long and strip the leaves off the lower half of the stems.

3. Choose a rose or other prominent flower for the center of the tussie-mussie, surround it with sprigs of herbs, and bind the stems together with floral tape. The warmth from your hands makes the waxed tape stretchy and able to stick to itself.

4. Surround the center flowers with concentric circles of herbs alternating with flowers, securing each circle of stems with floral tape. Take care to keep the tops of the herbs and flowers even, forming a mounded or mushroom silhouette. Continue to add circles until the tussie-mussie is 4 to 6 inches in diameter and all your floral symbols have been included.

5. Frame the tussie-mussie with a circle of larger leaves (such as lamb’s-ears, ivy, or scented-geranium leaves), overlapping them evenly around the outside edge. Bind these in place with floral tape.

6. With the pruning shears, trim the stems to 3 inches long, or about the width of your palm.

7. Slip the glove finger up over the cut stems to make a smooth handle by which the tussie-mussie may be carried. Because it is absorbent, it will hold moisture around the stems and help to keep them fresh. I use inexpensive cotton-knit gloves from a photography store, at a cost of a dime per finger.

8. Thread the tapestry needle with the elastic thread and sew a running stitch along one edge of the lace. Then tie the elastic to form a circle. Pull the resulting stretchy collar up over the stems and tuck it under the frame of leaves. Real lace is not only beautiful, but it is also more durable than paper lace doilies, which tear when wet. Antique lace may be used, or the lace can match a wedding gown or party dress. Even the most inexpensive lace looks lovely.

9. Finish the tussie-mussie by tying the satin ribbon around the stem handle right below the lace. Tie a bow. You may also tie overhand knots in the ends of the streamers for good luck, slipping a sprig of rosemary or statice (remembrance) into each one.

10. Write out a little gift card listing the plants and their meanings.

Tuesday, September 09, 2008

My latest Creation

This is a birthday card I made tonight for my uncle:


I used an altered coaster for the dog bone. The papers are Bazill and TLC creations. It is a bit hard to read in the scan, but the middle line says: 'Hoping your birthday is "PAWSITIVELY" wonderful' in a dog paw font from free fonts. The handwriting says, "Happy Birthday Uncle Gilbert! From the "Paw-see", Laura, Joe, Scooby & Pugsley. The ribbon is by Offray and purchased at Walmart, the epoxy paw seal is from Walmart as well. The boxer stamp is from Darice, and I used the ink pens from American Markers metallic collection.

Enjoy!

Monday, September 01, 2008

ATC Challenge

Here are my latest creations:


I joined a challenge on one of the groups I belong to for Artist Trading Cards. I have never made one before, and this was a lot of fun. I used cardstock from Club Scrap, Bazzill, mulberry papers, stamped images from Stampin' Up and an unknown company for my boxer stamp. The "made by" tags come from a stamp collection by Autumn Leaves. The inks are Stazon, ColorBox, and Anna Griffin. I used pop dots, tacky glue, and doublesided tapes for the adhesives. I used the Pebbles line of chalks to glitter chalk the embossed images made with my Sizzix Big Shot and their flower embossing template. The rickrack is from Offray ribbon, and the felt flowers are from Queen and Company. The metal discs are from Making Memories, and the ink pen is from American Crafts Galaxy Collection. Oh, I almost forgot, the beige craft paint is from the Pebbles line of paints. I used a medium square dry brush for the painted edges of the cards. Each of the embossed images is covered with an acrylic "bobble rock" from Walmart. They had a discount line of stickers back a couple of years ago, and those acrylic circles came from there. I used clear embossing powder from JoAnn's line of scrapping and stamping supplies over ColorBox purple ink.

Wow, when I write it out there were a lot of products!

It was great fun, and I hope the other artists enjoy my work. The theme was floral firsts, but I had to get my boxers in there, too! LOL

Wednesday, August 27, 2008

My latest album


I made this cute little flip flop photo album over the weekend to showcase some fun summer photos of my family & our fur babies enjoying the pool and boating over the past few summers. The flip flop straps are made of gingham ribbon. It has a small plastic sleeve to hold the album so it stays nice.

Tuesday, July 29, 2008

This weekend...

It went by way too quickly, but we got a lot done. My parents came down for the weekend, and we worked on our house. My step-son's bedroom is now ready to be painted and turned into my "dressing room". If we planned to stay in the house, I would be painting the room a pale pink. Since we are moving as soon as we sell, I am going to stick with a neutral color, and paint my dressers, etc. black and pink.

I got my trash hauled away, my laundry done, the bedroom prepped, made lasagna, mailed off some legal paperwork, and cleaned my house. All in all, it was a productive weekend. Oh, I forgot mowed the lawn, pulled weeds, and took out more trash from the backyard. Why do they package patio furniture in TONS of cardboard? Geez! So much for environmentally friendly! I hauled it all down to recycle. It filled the back of the pickup!

I could go on and on, but I won't. Hubby wants to watch "Weeds" before we go to bed.

Tata for now ~waves~

Sunday, July 13, 2008

My first Tear Bear


This is my very first tear bear using the heavy weight mulberry papers. I chalked the edges for added dimension & used pink chalk for the cheeks. The nose and eyes came with the kit. I used a slicker black fine writer for the whiskers and mouth.

Thank you BUFFY for sending me this kit to try! It was so much fun!

Time to Start adding my scrapbook stuff

These are file folders I made for a swap for Pet Pages for my dogs.

I stamped on colored card stock and added ribbon with staples to complete the look.


These are altered coasters I made for the same swap, but a different group. I covered coasters with cardstock and then die cut them with my Sizzix to make the shapes. I inked and embellished the items with ribbon to complete the look.


This is my very first attempt at a tear animal. I am happy with the results considering I used the wrong kind of mulberry paper for this project. I had tissue weight paper, rather than cardstock weight. I used chalk and a pen to add the accents.


Lastly these are tags I made for another swap for Father's Day. These are done on heavy weight cardstock. I stamped and inked each tag. The papers are reproduction advertisements that I got from a collage kit. The bottle cap is a beer bottle cap I took from my husband's beer bottling kit. I hammered the caps flat and then used my creative memories circle cutter to make the inserts. I used a decorative stamp to add the "D" to the center.

Sunday, March 30, 2008

Okay, so No one reads this...

but dang, then how do I get blog comment spam?!?!

I am the only one looking at my blog and reading it or doing whatever, and I get spam. *shaking my head*

Something just seems so utterly wrong with that! Heck, at least let me get one comment of, "wow, your blog sucks." That would be better than blog spam!

Hell, it is almost as bad as getting a message on your cell phone only to find out it is some damn telemarketer! Blog spam is the internet equivelant to telemarketing!

Can you tell this frustrates me?

Okay, ~stashing my soapbox back under my desk~ I will save my ranting for another time.

~goodnight~

Monday, March 10, 2008

Free Pearls

Pearls, pearlsand more Pearls

Sunday, March 09, 2008

Have you ever..?

Awakened one morning and felt life passed you by?

Wondered where the time went?

Forgotten what it felt like to really live your life?

Gotten so caught up with illness (yours and your family's) that you just let it consume all of your being?

I have. I am. It sucks.

How did I get here?

When did I get old?

Where did my hopes, dreams, and plans all go?

Who is this person I see in the mirror?

How did she get here?

More importantly, how is she now going to change her life for the better?

How will she start living again?

Saturday, March 08, 2008

I'm Back!

I haven't posted here since 2004. Wow! So much has changed since I started this blog. I still haven't gotten back into my size 3 Cruel jeans, but at least I was in them the first time I saw Trace Adkins in person *small swoon*.

Hubby no longer works due to his multiple sclerosis, so no more wishing him home early from work. He is always here now. He really hates that.

I have changed jobs three times since my last post.

I now have severe anemia which is totally messing up my life.

I only have three dogs now. It feels empty around here with just the three. I no longer only have boxer dogs. I have one crazy little puggle in the mix.

I no longer drive only a big SUV, but I know have an economical car. I commute 63 miles one way to work each day, then work 12 - 14 hours and come home. I barely have time to sleep and it is time to be back at work.

My anemia has put me in a bad place. It has made me very sick, and that has caused me to miss work and not be the wife I need to be. I sleep all the time. I am chronically tired, and chronically cranky. I thought I would avoid the flu this season, but when I got it, I got it good. I didn't think my blood levels could get any lower, but they did. So now I get iron infusions once a week to try to get me back to normal. I have been battling this for 6 months now, and my levels still haven't improved.

My house and craft room are a mess. We are remodeling for hubby, so that his wheelchair can get around everywhere. We previously had a sunken family room, now it is all one level. We also replaced the doors and widened the doorways to the kitchen and dining areas. We put in energy efficient windows and doors. We put up a new roof, and we got a new heating/air unit to keep the temperatures normal for hubby. With MS hot temperatures can cause severe flare ups.

My step daughter has graduated high school, and has turned 21. My step son will graduate in May and he is already 18. Wow, what a way to make me feel old. I wish sometimes that I would have had kids of my own, but I didn't. Some say it isn't too late, but with our health problems, I think my time has passed me by.

Well, I have rambled a long time, so who knows! Maybe I will post tomorrow. Maybe it will be another 4 years! ~chuckles~ Guess we will see where serendipity takes me!

Related Posts with Thumbnails