Monday, June 21, 2010
Copic Mondays - The Markers -
Which Copics are best? It is a common question that is asked by anyone considering the investment in these great markers. I know I wondered myself, why would someone pay over $6 for a marker. Then I tried them! I fell instantly in love with the way they color and blend. Trust me, buying PrismaColor or Sharpie markers are no where near close. They might all be alcohol markers, but not all markers are equal in quality. Copics are non-pilling. They blend evenly without destroying the paper.
With Copics, they are literally a lifetime marker. You can replace the nibs, and refill the inks on all of your markers. Ink and nib replacements are inexpensive to do, and you have a lifetime of service. Once a Sharpie or Prismacolor runs out, you have to throw it away and buy a new marker.
All Copic markers have a guaranteed 3-year shelf life. The color consistency between all of the lines is completely guaranteed by Copic. If you buy RV00 in a Ciao, Sketch and Original, all of those colors will be the same.
All Copic markers are low odor, and are easy to clean up using an hand sanitizer with alcohol or alcohol wipes.
So you know "why" Copics, but now the question is which marker is best for me?
Ciao
The Ciaos are the least expensive of the Copic Markers. The hold the least amount of ink of all the Copics. Their shape is round, rather than oblong. They will roll off of you work surface. The marker caps do not have the color number on them, but the cap is color is the marker color. The nibs on the Ciao and the Sketch markers are the same. The Ciaos come in a total of 144 colors, and there will not be any new colors added to the Ciao line. The Ciaos will not work with the Copic airbrush system. They are a great economical choice.
Do be careful if you purchase the Ciao markers. Each marker has a ring inside the cap with air holes. This is to prevent choking should anyone accidentally swallow the cap. When putting your caps on your markers, be mindful of the rings inside. You do have the potential to damage the marker tip if you don't line it up correctly in the cap.
Sketch
The Sketch are by far the most popular of the Copic marker line. In fact, card makers and scrapbookers are the fastest growing market for Copics overall. The Sketch markers hold a full 2 oz. of ink. They come in 334 colors with new colors due on the market very soon. No other marker set has this many color options available. The Sketch markers can be used in the Copic airbrush system. They are created with an oblong shape with prevents them from rolling off of your work surface. Each end of the marker has the marker color number printed on it. Like the Ciao the cap is the color of the marker. The gray ring on one side indicates your brush tip side of the marker.
Original
The Copic Original markers have a medium broad tip and a fine tip. They are great for lettering, journaling and small images. The fine tip allows you to create very detailed artwork. Because they don't have the brush tip like the Ciao and the Sketch, you cannot do techniques such as feathering. Oringials come from the factory in 214 colors. There are empty markers available, so the line is expandable to all 334 colors by using the empty markers and the refill inks. They are compatable with the airbrush system.
Wide
These are great for large areas. They are easy to refill. Due to the extremely large 3/4" nib, they use a lot of ink. The 3/4" nib comes in two style: the Calligraphy nib and the Standard Broad nib. The Wide markers come in 36 popular colors, but like the Originals they are expandable to all 334 colors using empty markers and the ink refills. These are great for coloring large areas. They are excellent when used for backgrounds, calligraphy and architectural design.
Ink Refills
Ink refills are available in all 334 Copic colors. How many times will one ink refill fill up your marker? Here is the chart:
Since the Ciao holds the least amount of ink, you will be able to refill it 15 times with one refill bottle. The Sketch marker can be refilled 12 times, and the Original 9 times.
Nibs
You can change the nibs on your markers. The Ciao and the Sketch both come with the Medium-Broad and Super Brush nibs. The Original marker comes with the Medium-Broad and Fine nibs. The Wide marker comes with the Calligraphy or Chisel nib.
Ciao nib options:
Sketch nib options:
Original nib options:
I hope this really brings together some marker basics for new Copic customers, and answers some basic questions for those of you that already love these markers like I do. In future articles, I will bring you information and uses for the multi-liner pen, Atyou Spica Glitter pens, the Colorless Blender, and the Colorless Blender solution.
Remember the complete line of Copic Markers are available in the Cutters Creek store.
**Credits - information from Copic International, Jennie Lin Black, and I like Markers. Photos courtesy of Copic International.
Posted by BoxerBrats at 12:35 AM 1 comments
Labels: Copic Markers
Sunday, June 20, 2010
Paper Romance Challenge Entry
Paper Romance has another challenge this week. It is to make an easel card. I decided to do one using a Magnolia image that I received in an image swap. I simply love Magnolias, but I don't own any of my own, yet.
Here is my entry:
I started with a 5.5" x 5.5" card base. I cut my black background at 5" x 5". I scored my card at 1" diagonal sections to form diamonds using my ScorPal. Next, I cut a 2" strip of white cardstock, and I punched the edge using my Martha Stewart (MS) border punch. I cut a 1" strip of patterned paper. I used ScorTape to join the two pieces, and then again used score tape to wrap the 3/8" white Offray grossgrain ribbon around the seam. I the attached this section to my card using foam tape. I wrapped a 1/2" piece of white Offray grossgrain ribbon just below half way on the card and tied a bow. I adhered it in place using ScorTape and a Glue Dot for the knot of the bow. I added the heart button using a Glue Dot.
For my Magnolia image, I colored her with my Copic Markers, and then added Glossy Accents to make her shoes sparkle. I added yellow and brown Flower Soft to the center of the sunflower using the Flower Soft Glue. I mixed the two colors before adding them to the flower. After the Glossy Accents and Flower Soft glue dried, I cut out my image using my Cutter Bee scissors. They are just the best for precision cutting. I added her to the card using two layers of foam tape.
I stamped my sentiment on my white cardstock using Colorbox Chalk ink in Charcoal. I cut out the sentiment strip and then mounted in on solid and patterned cardstock. I added the sentiment to the card using foam tape.
I punched out the butterflies with my MS punch using scrap glitter papers I had in my stash. I added MS pearls to the centers, and the attached the butterflies to my card using my Glue Dots. I added MS pearls to the diamond points that were visible.
For the inside I cut a 5" x 5" square of patterned paper. I added a border strip using my same MS border punch on a 2.5" piece of white cardstock. I adhered it to the patterned paper, and then wrapped the seam with my 3/8" white Offray ribbon. I added two butterflies done with scraps of cardstock and the MS pearls.
I stamped my inside sentiment on a 2.25 inch scalloped oval that I cut using my From the Kitchen Cricut Cartridge. The oval is a component of the sheep image. I stamped my sentiment and butterfly on using Colorbox Charcoal Chalk ink. I accented the butterfly using my Copic markers, and some MS pearls. I adhered that to my card using foam tape.
I hope this card will bring a smile to the face of a friend at a difficult time. Let me know what you think~
Posted by BoxerBrats at 11:15 PM 1 comments
Scrappy Frogs Sketch Challenge
Hop on over to Scrappy Frogs Challenge Blog ~ This week the Design Team's challenge was to create a project using the provided sketch. Wow, I just wasn't happy with anything I was coming up with, and I really hate it when that happens. I am still not completely thrilled with my card, but there are some elements I love.
The cameo button is simply amazing. I found this in my Granny's button box, and I had to use it on a vintage feel project. The papers are all from DCWV. The embossing folder is from Sizzix for Stampin' Up. The ribbons and laces are assorted ones from Granny's sewing stuff and my sewing stuff. Same thing goes for the pearl strands. I used stamps from Inkadinkado and Papertrey. The inks are from my Copics and Colorbox chalks.
I wanted to hurry and get this posted to my blog since it is 3 a.m. Today is Father's Day, and we have a lot planned.
Posted by BoxerBrats at 3:09 AM 0 comments
Thursday, June 17, 2010
Two more Father's Day Cards
Father's Day is this Sunday, and I had a couple more cards I needed to get done. It seems masculine cards are always the hardest for me to do. Here is what I came up with:
 This card was made with left over papers from other projects. I started with a standard kraft side-fold card. The background was a left over from some map paper I had from a travel project. I had a scrap of red card stock, and I stamped my compass image. I cut it out close using my Cutter Bee Scissors. They are the best for intricate work. I threaded my button and attached it using Glue Dots. The blue patterned paper was cut at 2.5" and I distressed the edges for a more aged look. I inked my edges as well for the well worn look.
 I added my scrap piece of ribbon using my 1/4" ScorTape. I used my 1/2" ScorTape put the cardstock pieces together, and then to attach the finished piece to my card front. Lastly I added my compass using a Glue Pop Dot.
 For this card I got a bit fancier. I used all Basic Grey papers for my patterned papers, and they are available in the Cutter's Creek Store. These are from Green at Heart, Kioshi, and Indian Summer. I started with a kraft paper gate-fold card. I used my ScorPal to get the perfect folds. I cut my cardstock and distressed all of the edges on the patterned papers. I attached them using my ScorTape.
I cut a 3.75" x 4" Kraft paper square, and I distressed those edges as well. I used a scrap piece of blue cardstock at 3" x 3.5" for the ocean/sky background, and drew curly circles on the bottom 3/4" of the blue piece using my Inkssentials White Gel pen. I cut out my stamped sailboat using my Cutter Bee Scissors. Lastly I adhered the piece together and then to the card using my ScorTape.
I stamped my images and sentiment using the Tsukineko Cocoa Brown Ink on both cards.
All of the basic supplies I used to make these cards and the Basic Grey papers are available in the Cutter's Creek Store.
Be sure to check out the full line of Basic Grey papers and kits. They have such amazing papers! I love the texture and weight of their line. There are even some Christmas papers available .
Remember Kim will always do special orders. If you are looking for special items, be sure to ask her about them. I am super excited about the new PINK ATG gun! Pink just rocks!
Posted by BoxerBrats at 9:09 PM 0 comments
I won at Paper Crafts Corner!
Oh my goodness! I am still in shock. I was blog hopping around a few days ago, and I found Paper Crafts Corner. The giveaway was so amazing. I entered, but never dreamed I would really win. Wow~ I almost fainted when I got the email today saying I won!
This great kit was donated by SweetPeachCropShop.com . Look at all that amazing stuff!! I can't wait to play in my craft-room when this arrives!
Check it out:
Posted by BoxerBrats at 2:37 PM 1 comments
Thursday, June 10, 2010
Summer Card Challenge
I was browsing blogs, and I found a challenge at Paper Romance Blog to make a summer card. I thought to myself, I have the perfect summer card idea! Well, maybe not total perfection, but fun none the less. I used some new Stampavie stamps that Kim will be carrying in the Cutter's Creek Store. I thought this one would be great for a summer challenge.
Here is my creation:
I stamped my images on Neenah Solor White Cardstock using Memento tuxedo black ink. Of course, my Copic markers were used to color the entire image. I coated the car in Glossy Accents to give it a race car red shine. I added silver Stickles to the hub caps to make them shine. I added gold Stickles to the sunshine for some added sparkles. The stamp is "Going Places" from Stampavie's line by Leere. Cutter's Creek will begin carrying those stamps very soon! The Road Trip is from a travel stamp collection, and I don't have any idea who the manufacturer is anymore. The background paper is from Quick Quotes. It is an old summer collection from a couple of years ago. The ribbon is from Offray.
I hope you like the card. It just said summer road trip to me. If I had a convertible, that would be Hailey and I out for an adventure! I can see her with her ears flapping in the wind in the backseat! She would love it.
Copic Colors used:
B000
BG13
C1, C3, C5, C7, C9
E0000, E00, E02, E07, E50, E51, E53, E55
R02, R22, R24, R29, R81, R83
RV00
Y0000, Y000, Y06, Y08, Y23
YG00, YG11, YG13
YR02, YR04, YR09, YR23
Colorless Blender 0
Also used: Glossy Accents, Stickles (gold & silver), ScorTape, Pop Dots, Memento tuxedo black ink.
Posted by BoxerBrats at 2:08 PM 5 comments
Saturday, June 05, 2010
Spring Layout
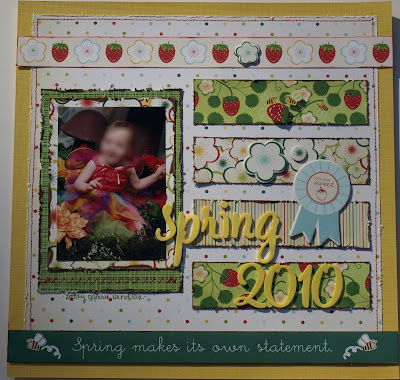
I love this layout and the paper pack I used to make it. It is Cosmo Cricket's Garden Variety paper and embellishments. The title is done with the American Crafts Thickers foam stickers.
The picture is of our granddaughter. Her face is blurred at our daughter's request. The photo is perfect for this paper. She looks so cute in her little fairy girl outfit! I love the way the garden papers match her picture. I must admit the strawberries are my absolute favorite in this line.
I used the Sketch above from www.scrap-a-little-sketches.com. April at Scrappin' n Chattin' found the sketch for our 24 hour layout challenge. She hosts the 24 hour layout challenge each month. She finds three great sketches. Each participant lists out three paper packages that they currently own. April chooses our partner, and our partner secretly decides which sketch and papers we will be using for the challenge. When the challenge starts, the choices are revealed. We then have 24 hours to complete and post our layout. Unfortunately, yahoo wouldn't cooperate with my upload this time. Oh well, I wasn't in the contest, but I got this great layout done anyway!
Posted by BoxerBrats at 1:09 PM 0 comments
Friday, June 04, 2010
Unity Stamp Giveaway - CJ's blog

CJ is having a great Unity Stamp giveaway on her blog - Click here. You can have a chance at this great April Kit of the Month! I love this set!
Posted by BoxerBrats at 9:02 PM 0 comments











.jpg)


