Sunday, August 29, 2010
Santa and His littlest Reindeer
Today's card is Santa and his littlest reindeer! This card was fun to make, and I really enjoyed using my two favorite crafting items -- My Copics and my Cricut. They are a great combination.
I started with a standard 4.25" x 5.5 inch kraft cardstock card. I went with a lot of layers on this one for depth. The papers were "busy" so I wanted them to have a bit more depth and definition. The solid layers helped achieve that goal.
The first layer is 4 1/8" x 5 3/8" cut in white cardstock. The next layer is 4" x 5.25" cut in kraft cardstock. Then my next layer is 3 7/8" x 5 1/8" cut in patterned cardstock. The band is cut at 3.75" x 4" with a white border paper 1/8" larger all the way around. The band is added to the card with foam tape.
Now for the fun part! Santa is cut at 3.5" using my Paper Doll Dress Up Cricut cartridge. I accented his layers using my Copic Markers and my Copic Multiliner pen. I also used the Multiliner pen to draw in the eyes and the glasses. My reindeer comes from my Cindy Loo Cricut cartridge. I didn't have the perfect color cardstock, so I colored her body in using my Copic markers. For an added extra, she had to have a googly eye. I put them together using Mono Liquid adhesive. I added them to my card front using foam tape for dimension.
Now to the inside. I wanted to make a gift card holder, so I cut a white strip of cardstock at 4" x 6". I finished the edge using my Martha Stewart double loop border punch. I thought it matched the patterned paper the best out of all my punches. I scored the bottom end at 2" and folded it over to make the card holder. I adhered the edges only using ScorTape. I added a 1 7/8" x 4.5 inch strip of patterned paper. I made it slightly wider so I could wrap it around. Next I cut the holly border, and airbrushed it to match with my Copic marker and Copic airbrush system. The little tag is cut using the Cricut cartridge Tags, Bags, Boxes and more. The kraft layer is 1.75" and the white tag is 1.5". I stamped my Papertrey Ink sentiment with Olive Pastel Colorbox chalk ink, and then lightly chalked the edges. I adhered the two pieces together using an eyelet and my trusty Crop-A-Dile. A small piece of twine completed the tag look. I added the pocket to my card with ScorTape, and then added the tag with foam tape. A nice Micheal's gift card inside, and the gift is complete :)
Have I lost you yet? I think the end of this Christmas Card Challenge is going to require a blog candy give-away. Stay tuned. I am putting together a great Christmas package for one lucky reader!
Posted by BoxerBrats at 11:12 PM 5 comments
Labels: Christmas Cards, Copic Airbrush, Copic Markers, cricut die cuts, Crop-A-Dile, Gift Card Holder, ScorPal, WRMK
Saturday, August 28, 2010
Pop-Up Penquin Card
I had a lot of fun making this card, but it did take me a lot longer to complete than I planned. The directions for this card came initially from Card Maker magazine. There were a few things that I had to figure out a bit further from the directions, and I did somethings using my Cricut instead of the Spellbinders dies.
To get started on this one, I cut a 4" x 12" piece of red cardstock. I used the Core-dinations red. I scored at 2" 4" 8" and 10" using my ScorPal. Then I marked the middle of the card 6" with a light pencil mark. For the folds to work out, be sure to be accurate on your measurements for everything. You are going to use the 6" middle markings on top and bottom to score an X in the middle section. Line your score mark with the top of the 6" and the bottom of the 4", then the top of the 6" and the bottom of the 8". Flip and repeat. You will end up with a scored X in the middle portion of the card. Fold all vertical lines as valley folds, and fold all diagonal lines as mountain folds.
I used my Cricut for the card front. You can use a number of cartridges to complete this project. The Accent Essentials, From My Kitchen, and Preserves cartridges all have scalloped circles and regular circle cuts on them. I set my machine on Real Dial Size. I used the Accent Essentials, and I cut my scalloped circle at 4.75". I repeated the cut with my Preserves cartridge, and it came out a little different with the same setting. I cut my center circle at 3.75".
I used my Inkadinkado stamp set and chose the penguin. I stamped him first on a post-y note to make a mask. I used Memento Tuxedo Black ink, because I planned to color my images with my Copic Sketch markers. I stamped the center penguin first centering him visually. I covered him with my post-y and then stamped his two friends. I added the snow mounds using my Copic 0.5MM Multiliner pen. I wish now I would have snapped pictures during the coloring stages to show you exactly how I created the feathered blue in the snow. I will remember that next time.
I colored the image using my Copic Sketch markers (colors listed at the bottom of this post). I placed the scalloped circle on top of the card for centering. (You want the scallops to cover the fold points when the card is finished). I adhered the stamped image to the scalloped circle using Mono Liquid Adhesive, because I wanted time to be able to be sure my image was centered correctly. I placed it aside so I could add randomd drops of Icicle Stickles for the snowflakes effect. I then added Liquid Pearls on centered on each scallop. I must admit that I need to work a bit more on my technique with this product. Some of my pearls are better than others.
I Cut four strips at 3.75 x 1.75" using patterned paper, and two strips of red cardstock at 1.5" x 3.5". I adhered complete strips centered on the outside flaps of the card. Layering red cardstock over patterned paper. For the folded sections, I marked the center of the remaining two patterned strips, and cut them at a diagonal. Placing the center mark and the corner along the paper cutter line. This gave me my long piece and my two triangle pieces cut perfectly for both sides. I adhered those on each side.
Next came the snowflakes and decorations. The snowflake brads, snowflake die-cuts and star punch out were all random items in my stash. I used clear Twinkle Jewels for added effects, and I adhered those using Glossy Accents. Lastly I accented all of my decorations with Icicle Stickles.
Once everything dried, I adhered my center medallion to the center square.
And there you have it! My very first pop-up card. Wow, now what to try next?? The challenge ends in just a couple of days! I have to pick something harder for my final card. Any suggestions??
As always, I would love to hear your comments!
Products used in this project are available at Cutters Creek:
Cricut Expression
Cricut Cartridges - Accent Essentials, Preserves, From My Kitchen (circle & scalloped circle cuts)
Copic Sketch Markers
- Colors used: 0 (colorless blender), 100 (black), B0000, B000, R17, R22, R27, R29, Y38, G05, G17, G20
Twinkle Jewels
Glossy Accents
Mono Liquid Adhesive
Core-dinations Cardstock
Ranger Stickles - Icicle
Liquid Pearls - White Opal
ScorPal
Inkadinkado Stamps
Memento Tuxedo Black Ink Pad
Other items - Patterned paper - red glitter snowflake Imaginisce - Snowy Jo
Snowflake Brads
Die Cuts snowflakes (2) & Die Cut Stars (4)
Posted by BoxerBrats at 10:54 PM 9 comments
Labels: Christmas Cards, Copic Markers, Core-dinations, cricut die cuts, Imaginisce, Liquid Pearls, Pop-Up Card, ScorPal, stamping, stickles
Sunday, August 15, 2010
Scrappin' and Chattin' Blog Hop
If you made it here from Sue's Blog, you are right on track. If you came to my blog first, please click here to go to Abby's blog to start the hop from the beginning. Be sure to visit and comment on each blog to be entered for the "BIG" prize. Remember, you need to follow the blog hop in order. You are collecting secret words hidden in each post that enable you to win the BIG GRAND PRIZE! Once you complete the hop, return to Abby's Blog, follow the instructions, and you will be entered to Win, Win, WIN!
![]() |
| One lucky winner will receive 2 new Cosmo Cricket collection kits (Togetherness & Mitten Weather) including Ready Set Chipboard. As well as a new Cosmo Cricket (Matilda) 6x6 paper pad! |
With the winning stuff covered, let me thank you for coming by! I always love guests, and I am super excited about this blog hop. It is our first after-all :) The theme for our hop is "favorite things". For me, when it comes to crafting, I have way too many items in my favorites pile. Right now my Copic markers are at the very top of my list. I also love the Magnolia stamp line, Martha Stewart punches, my Cricut, my computer, my ATG gun (even though I am longing for the new pink one), Stickles, and so much more! ~LOL~ Like I said, crafting is my weakness.
For this blog hop project, I knew I was starting with my Magnolia stamps and my Copic Sketch Markers. I picked my Copic colors based on the papers I chose for the finished project. I colored two images, and added Glossy Accents to the shoes. I guess I should tell you that I made two images because I let my husband choose the image that he liked the best for the card. He got the honor, because I was making this for his mom's birthday. After much deliberation, hubby picked the cake image. I added Diamond Stickles to the candle and the cake for a little frosty sparkle.
| Front View |
| Inside of Card |
| Easel Back View |
| Tilda with a Cake - Close Up |
Supply List:
- Papers: DCWV Nana's Kitchen, DCWV Home Accents, Bazzill Basics, and Bazzill Prism Premium cardstock.
- Copic Sketch Markers
- Ink: Colorbox Chestnut Roan Chalk ink
- Stamps Studio G Basics $1 stamps at Micheal's
- Ranger Diamond Stickles
- Glossy Accents
- Ribbon - Offray
- Flowers - Recollection Mulberry Paper Collection
- Tools: Martha Stewart Punch Around the Page Double Loop Set, Martha Stewart Punch Around the Page Eyelet Lace Set, Martha Stewart Flowerbed Deep Edger Punch, ScorPal, Fiskars Paper Trimmer, Making Memories Bone Folder, QuicKutz Pick Up Tool, and Martha Stewart Craft Mat
- Adhesive: Mono Liquid Adhesive, Glue Glider Pro, 3M ATG gun, ScorTape, 3D Foam Adhesive, and Scotch Tape
Now for the fun stuff~ I am giving away 2 blog candies in honor of our first blog hop. Here is what you need to do to enter. First, they are limited to the United States. Sorry, international shipping is more than I can cover right now~ These boxes are heavy!
| 75+ Papers, Die Cuts, Chipboard, Alphas, Stamped Images, Page Kits, Design Template, Stickers, 3 Mini Albums, handmade embellishments, epoxy stickers, vellum tags, findings, metal tags & MUCH MORE!! |
Candy #1 ~ This is the biggest, so it requires the most "work"~ For your one entry become a follower of my blog, and promote this blog hop on your blog. Leave me a comment including your blog address telling me you have done both. (I will be checking the blogs to be sure this is fair).
Want a couple more chances to win???
For up to 2 extra entries, promote this blog hop on Facebook and/or Twitter. Leave a comment on this post letting me know what you said/did. Post your Facebook name or Twitter account name. That's it!
You can have up to 3 entries for this prize. Be sure to check back on Monday (8/16) to see if you have won. If the prize isn't claimed by Friday (8-20), I will draw a new winner on Saturday!
| 50 Sheets of paper, alphas, 3 mini albums, Stickers, Stamped Images, handmade embellishments, Vellum & chipboard tags & More! |
Candy #2 ~ this one is easy ~ Become a follower of my blog and leave a comment below saying you only want to be entered for drawing #2. You don't have to do anything else.
Easy Peasy! Same rules apply. Be sure to check back on Monday (8/16) to see if you have won. If the prize isn't claimed by Friday (8-20), I will draw a new winner on Saturday!
Now don't forget there is also the Blog Hop grand prize. Be sure you visit every blog on the hop and leave a comment to be entered to win this fabulous prize!
Next stop is Vicki's Blog. She has a great project to share, and a personal blog candy offered, too! Hop along and thanks again for stopping by~ I hope you visit again soon and share my blog with your friends, because bloggin', scrappin' and chattin' is a (secret word) "community" of wonderful people~
If you happened to get lost along the way, the hop order is as follows:
Oh, I forgot to mention this project is also my entry in the challenge #11 over at Party Time Tuesday~
Posted by BoxerBrats at 12:00 AM 68 comments
Labels: birthday cards, Bling, blog candy, card making, chalking, Copic Markers, easel card, Martha Stewart Punches, Paper Flowers, primas, ribbon, ScorPal, stamping, stickles
Thursday, August 12, 2010
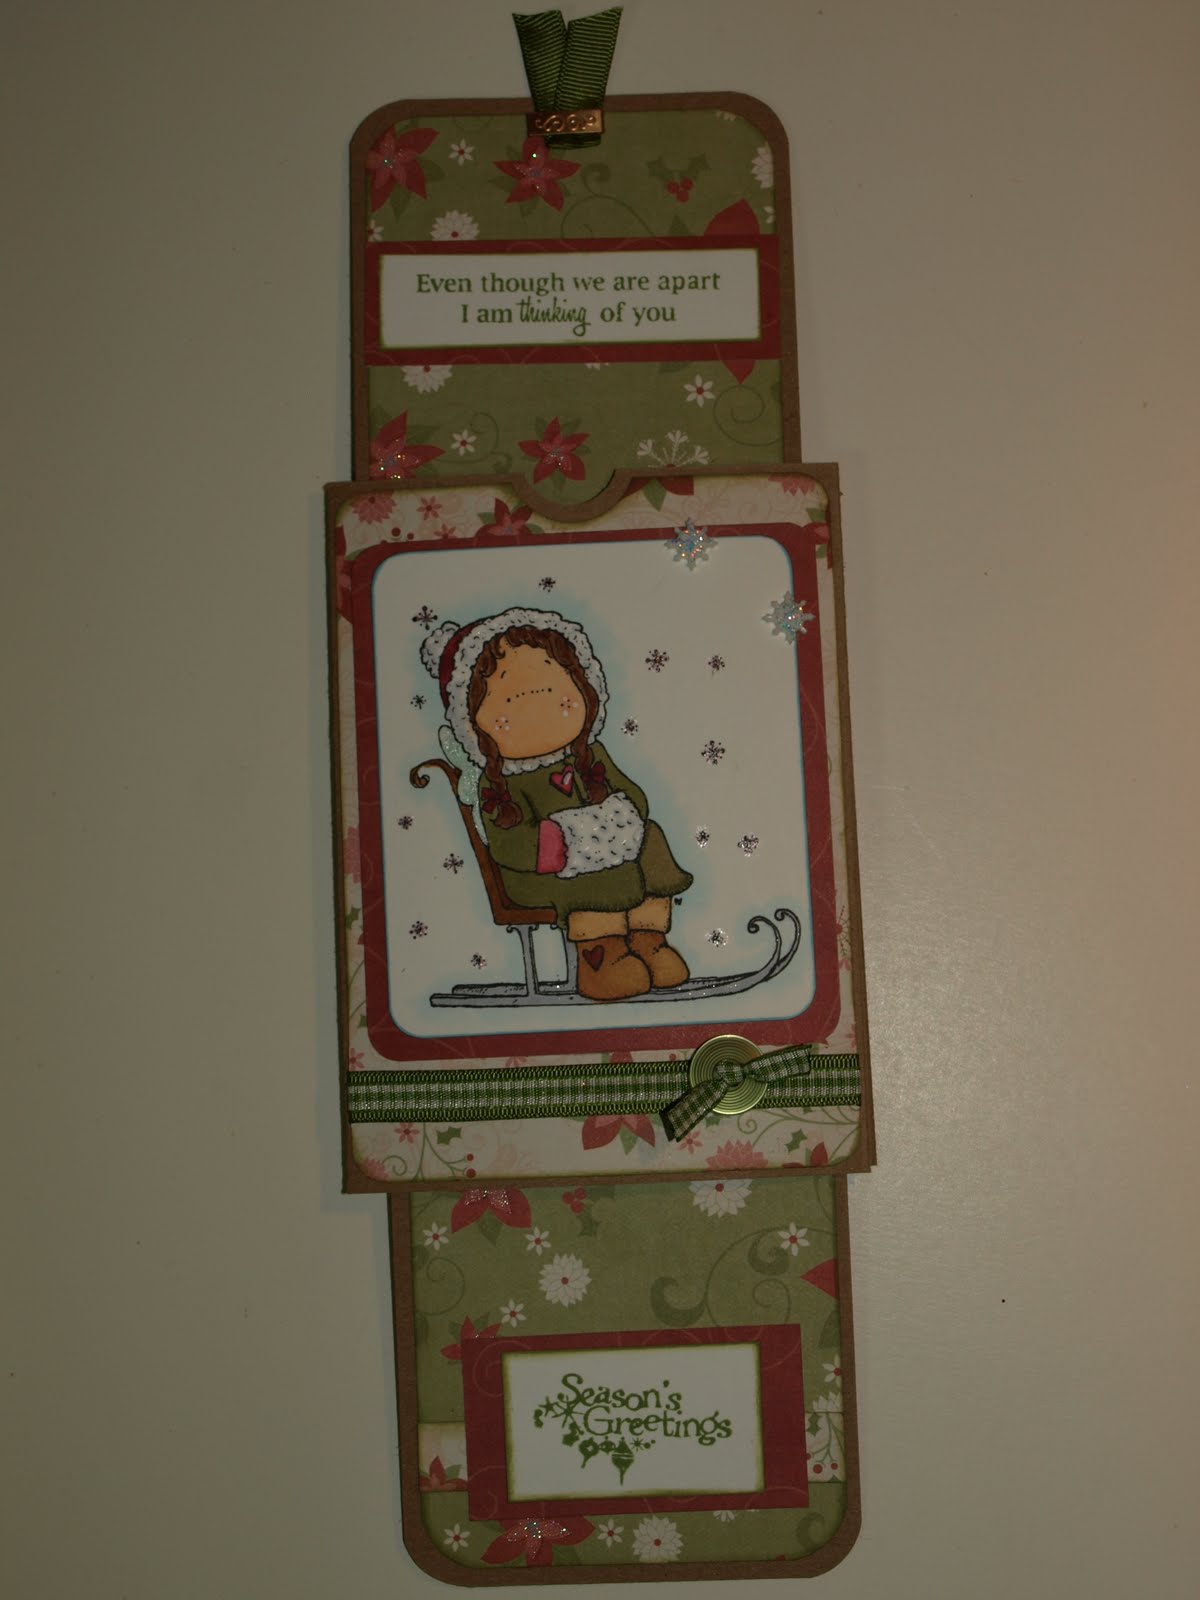
Magnolia Christmas Slider Card
Today's card is a double challenge card. At Scrappin' n Chattin' on Yahoo Groups, I am in an Every Day Card Challenge for Christmas cards. Over at Scrappy Frogs Challenge Blog, our challenge is to make a slider card. Sherri found these great directions on You Tube ~Click Here~ for making these fun cards. This is my first ever slider card. It was fun to do :)
I started working on my project in my so organized craft room ~laughing hysterically~. It is hard for me to believe that I actually cleaned my entire room 2 weeks ago. From the looks of this photo, it looks like a hurricane hit recently.
As I was working away, I looked down to find my Boxer Scooby Doo asleep in Hailey's little dog bed. You see Hailey is always in the craft room with me, and normally, I am trying to get her out of my chair. She loves to sit right behind my back. In fact, that is where she is as I type this. A 100# Boxer Dog doesn't fit well in a Puggle bed. LOL
So back to my card. I used another Magnolia image, and of course, she is colored using my Copic Sketch Markers :) I added some Stickles Glitter Glue and some bling from the Copic Spica pens.
The slider part is so cool. You will see the "secret" is a plastic shopping bag if you watch the video. Here is the the card closed:
And then sliding a little ways:
And then all the way open:
Since I added so many pictures, I won't bore you with all the directions! The papers are from Imaginisce. The ribbon is Offray. The button is from Making Memories. The stamp sentiments are from Inkadinkado and Papertrey Ink. I used Memento Bamboo Leaves ink for the sentiment, and Colorbox Chalk Ink in Olive for inking the sentiment edges. For the Magnolia image, I used the Ranger Distress Ink (Tumbled Glass) for the edges. I also used a white gel pen from Inksentials for accenting the image. Of course, all coloring was done with my Copic Sketch Markers~
Posted by BoxerBrats at 10:24 PM 4 comments
Labels: buttons, Christmas Cards, Copic Markers, inking, Magnolia, ribbon, ScorPal, Slider Card, stamping
Friday, July 09, 2010
Girly Girl Card for My Auntie's Birthday & Scrappy Frogs Challenge Blog
For my aunt's birthday, I knew I wanted something very pretty and feminine. I wanted it to be a special card she could display on her desk at work, and enjoy for a while.
I started by coloring my Magnolia image using my Copic markers. For additional interest, I added Flower Soft to the sunflower and Glossy Accents to the shoes. I accented a few places using my Inksentials white gel pen. I set her aside to dry and went to work on the card.
My overall card is a 6x6. The paper is cut at 6" x 12". I scored at the 3" and 6" lines using my ScorPal. My pink background layer is cut at 5.75"x 5.75". I distressed the edges using my Making Memories edge distressor. My floral paper layer is cut at 5.5" x 5.5", and again I distressed the edges. I used my Glue Glider Pro to attach the papers, and then I sewed around the edges using brown thread (Gutterman). I went around the edge twice being sure to make it look uneven and vintage. I attached the completed piece to my card base.
Next I made the lace band. The background is pink floral paper with white cardstock overlay, then pink cardstock, and followed by the white cotton lace. I attached the completed piece to my card using foam tape squares.
The sentiment is from Papertrey Ink, and I stamped it using Versamark Ink then embossed it with pink embossing powder. I die cut the sentiment out using my Sizzix oval bookplate die. I chalked the edges with Colorbox chalks, and then cut a second die cut using the pink cardstock. I layered the bookplates together using foam squares. I added flowers from Prima and American Crafts accented with Martha Stewart pearls. The pink/lavender pearl is from Michaels.
My Magnolia was dry, so I cut her out using my Cutter Bee scissors, and added her to the card with foam tape.
For the inside, I cut another piece of pink cardstock and distressed it like the front. I used a smaller piece of floral pink card stock for the center, also distressed. The labels were cut using my StoryBook Cricut Cartridge (Real Size Dial set at 4" for the large and 2.5" for the small). I embossed the smaller one with my Cuttlebug Swiss Dots folder and then used my Colorbox chalk inks over it and on the edges for dimension. On the larger one, I just inked the edges. The birthday cake was stamped on several scraps of cardstock using the Colorbox Chalk ink. I added Stickles for dimension to accent the details. I stamped the candles on white cardstock using the same inks, cut it out using my scalloped circle punch, and then colored my candle flames with my Copic markers. I then put Stickles on top for more candlelight sparkle. I cut out each section of the birthday cake from separate papers for layering.
For the accent bar to hold the easel part of the card, I cut a strip of white cardstock then embossed it using my Cuttlebug Swiss Dots folder. I set it aside, and cut a smaller piece of floral paper and distressed the edges. I cut another piece of pink cardstock, then covered it with a piece of satin ribbon using my ScorTape (it is so great for ribbons). I layered the pieces together using my Glue Glider Pro and my foam tape squares. I added the pearl strands using Beacon 3 in 1 adhesive.
I stamped the Birthday Wishes from my Papertrey Ink stamp set on a scrap piece of pink cardstock with my Versamark Ink and then embossed it with the pink embossing powder. I then freehand cut it out using my Cutter Bee Scissors. I layered the pieces on using foam tape and then added the three Michaels pearls.
On the back I had to add my boxer dog. It is an old Hero Arts stamp that I bought in the 80's (I think). I stamped it using my Colorbox chalk ink on white cardstock. I punched it out with my Creative Memories circle punch, then punched the larger circle with the pink cardstock. I chalked the edges then added them to my card.
My aunt LOVED this card. She was so happy with it. I was really pleased with how it turned out, and it is so very girly girl!
Products Used from Cutters Creek:
Circut Storybook Cartridge
Brown and Sunshine Yellow Flower Soft & Flower Soft Glue
Cuttlebug Swiss Dots A2 folder
Prism (Bazzill) White Cardstock
Memento Black Ink
Colorbox Chalk Ink
Copic Markers
Inksentials Gel White Pen
Cutter Bee Scissors
3M Foam Tape
Versamark Ink Pad
Glossy Accents
Glue Glider Pro
Beacon 3 in 1 adhesive
Stickles Glitter Glue - Diamond
ScorTape
ScorPal
American Crafts Flowers
Core-dinations Cardstock
Misc Items:
Magnolia Stamp
Making Memories Edge Distressor
Papertrey Ink Stamp Sets
Hero Arts Boxer Dog Stamp
Cardstock - Making Memories, TLC & Misc.
White Cotton Lace
Prima Flowers
Martha Stewart Pearls
Creative Memories Circle Punch
Strand Pearls
Offray Satin Ribbon
Michaels Pearls
Posted by BoxerBrats at 12:00 AM 0 comments
Labels: card making, Circle Punch, Copic Markers, cricut die cuts, Cuttlebug, foam dots, glitter accents, inking, Paper Flowers, Pearls, ribbons, ScorPal, sewing machine stitching, Sizzix Die Cuts, stamping
Thursday, July 01, 2010
Hummingbird w/ Basic Grey "Dream" Card
I received this wonderful papers from April for being Member of the Month at Scrappin-n-Chattin' on Yahoo Groups. I love them so much! I made this simple easel card using Kraft cardstock that my hubby picked up for me at Hobby Lobby. I stamped the Hummingbird using an Inkadinkado stamp from Cutter's Creek. I used my Memento Tuxedo black ink, because I wanted to color my image with my wonderful Copic markers. I stamped the sentiment using a stamp from Studio G's $1 stamp sets. I think I picked it up at Michaels. I used the Versamark ink, and then embossed it using white embossing powder from Judikins.
Other fun stuff used:
Martha Stewart border punch and butterfly punch
American Crafts Rhinestones
Twine
Making Memories Edge Distresser
Pop Up Foam Squares - 3M
Since July is such a fun summer month, I want to start out with a small blog candy. I will be building up more prizes all month long. To enter, just submit your name on a comment below. If you would like a second chance to win, add your name and link below. Include a link on your blog to this post and giveaway. You will receive a second chance in the drawing. For three chances, follow my blog. For FOUR chances, subscribe to my feed updates.
This candy will be 12 stamped Inkadinkado Fancy images to include butterflies, hummingbirds (the one used in this card) and others from this great stamp collection. All images will be on Neenah or Prism cardstocks, and stamped with Memento inks. They will be perfect for coloring with your Copic markers.
If my followers reaches 100 before the end of this giveaway, I will add more prizes! What a great way to start month number two of summer!!
Posted by BoxerBrats at 12:00 AM 11 comments
Labels: Bling, blog candy, card making, Copic Markers, easel card, embossing, foam dots, Martha Stewart Punches, ScorPal, stamping