Tuesday, August 24, 2010
Christmas Card Day 23
Today's card features a die cut from Cricut's Winter Frolic Cartridge. This little reindeer has a lot of of small pieces to make him so cute. I used three different glitter papers and some shimmer Core-dinations cardstock. Throw in a Cuttlebug embossing folder (bottom - circles) and a Sizzix Embossing folder (top - snowflakes).
I am going to have a whole line of critter cards by the time I am finished with my challenge :)
Posted by BoxerBrats at 11:31 PM 2 comments
Labels: Christmas, Christmas Cards, cricut die cuts, Cuttlebug, glitter papers
Friday, August 20, 2010
Every Day Christmas Card Challenge #20
Well, this is my last entry for the challenge over at the Paper Variety. This card was pretty fast to make, but I am super happy with how it turned out. The embellishment was in a variety pack of Jolee's establishments that I found on a recent trip to Micheal's.
For this card I picked out three embossing folders and three solid papers with white cores. I embossed each one with a different folder, and then I trimmed it to fit my card base (which is 5.25" x 5.25"). To make it easier to adhere, since I wanted the add the piece with foam dots, I mounted the embossed pieces on cardstock square that was approximately 4.75" x 4.75". The finished embossed piece is 5.0" x 5.0".
I added the Offray Ombre Ribbon. I then mounted the finished piece on my card with foam dots. I added the Jolee's embellishment and the Thickers Alphabet Stickers - Jewelry Box in Cocoa.
This was the kind of easy card that I needed to complete tonight. I just got home from the funeral of a very dear family friend and teacher of mine. It was an emotional day. I am grateful to have had the opportunity to have loved and lost this wonderful person rather than to never have known him. RIP~ Jimmy. You will be missed.
Posted by BoxerBrats at 10:07 PM 2 comments
Labels: Christmas, Cuttlebug, embossing, foam dots, Jolees stickers, ribbon, Sizzix Embossing Folders, Thickers
Friday, August 13, 2010
Every Day Christmas Card Challenge #13
Over at Scrappin' n Chattin' we are doing an Every Day Christmas Card Challenge. I am going to have all my cards done in August! Yeah! Today, we had an extra challenge -- include polka dots and plaid on your card. For me this was easier said than done! I struggled to find plaid paper. I finally found a small strip of green plain in my scraps bin, and that was the starting point.
I used my Cuttle Bug 5 x7 Polka Dots folder to emboss the green DCWV cardstock. I distressed the edges with my Making Memories Distress Tool (love this!). The rest of the patterned papers are scraps from various companies - black polka dot - Quick Quotes, Red Polka Dot - SEI. The tinsel fibers are scraps from a page kit I got so long ago. The typewriter key letters are a throwback from the 1980's. I tied them together with DMC Floss in black. I popped the letters off the card using one and two layers of 3M foam tabs for more dimension. The plaid piece is also popped off the card using foam adhesive.
Hubby decided to sneak back in my craft room with the camera while I was finishing this project to snap some pictures of Hailey in her dog bed -- to compare with the previous ones of Scooby :) Her is Miss Hailey in her scrappin' bed.
| Hailey ~ Relaxin' |
| Scrappin' is hard work - I need a nap. |
| I don' see what the big deal is. |
| This bed is Puggle approved! |
| This bed is perfect for a boxer -- really! |
Posted by BoxerBrats at 1:42 PM 0 comments
Labels: Christmas Cards, Cuttlebug, fibers, foam dots
Friday, July 09, 2010
Girly Girl Card for My Auntie's Birthday & Scrappy Frogs Challenge Blog
For my aunt's birthday, I knew I wanted something very pretty and feminine. I wanted it to be a special card she could display on her desk at work, and enjoy for a while.
I started by coloring my Magnolia image using my Copic markers. For additional interest, I added Flower Soft to the sunflower and Glossy Accents to the shoes. I accented a few places using my Inksentials white gel pen. I set her aside to dry and went to work on the card.
My overall card is a 6x6. The paper is cut at 6" x 12". I scored at the 3" and 6" lines using my ScorPal. My pink background layer is cut at 5.75"x 5.75". I distressed the edges using my Making Memories edge distressor. My floral paper layer is cut at 5.5" x 5.5", and again I distressed the edges. I used my Glue Glider Pro to attach the papers, and then I sewed around the edges using brown thread (Gutterman). I went around the edge twice being sure to make it look uneven and vintage. I attached the completed piece to my card base.
Next I made the lace band. The background is pink floral paper with white cardstock overlay, then pink cardstock, and followed by the white cotton lace. I attached the completed piece to my card using foam tape squares.
The sentiment is from Papertrey Ink, and I stamped it using Versamark Ink then embossed it with pink embossing powder. I die cut the sentiment out using my Sizzix oval bookplate die. I chalked the edges with Colorbox chalks, and then cut a second die cut using the pink cardstock. I layered the bookplates together using foam squares. I added flowers from Prima and American Crafts accented with Martha Stewart pearls. The pink/lavender pearl is from Michaels.
My Magnolia was dry, so I cut her out using my Cutter Bee scissors, and added her to the card with foam tape.
For the inside, I cut another piece of pink cardstock and distressed it like the front. I used a smaller piece of floral pink card stock for the center, also distressed. The labels were cut using my StoryBook Cricut Cartridge (Real Size Dial set at 4" for the large and 2.5" for the small). I embossed the smaller one with my Cuttlebug Swiss Dots folder and then used my Colorbox chalk inks over it and on the edges for dimension. On the larger one, I just inked the edges. The birthday cake was stamped on several scraps of cardstock using the Colorbox Chalk ink. I added Stickles for dimension to accent the details. I stamped the candles on white cardstock using the same inks, cut it out using my scalloped circle punch, and then colored my candle flames with my Copic markers. I then put Stickles on top for more candlelight sparkle. I cut out each section of the birthday cake from separate papers for layering.
For the accent bar to hold the easel part of the card, I cut a strip of white cardstock then embossed it using my Cuttlebug Swiss Dots folder. I set it aside, and cut a smaller piece of floral paper and distressed the edges. I cut another piece of pink cardstock, then covered it with a piece of satin ribbon using my ScorTape (it is so great for ribbons). I layered the pieces together using my Glue Glider Pro and my foam tape squares. I added the pearl strands using Beacon 3 in 1 adhesive.
I stamped the Birthday Wishes from my Papertrey Ink stamp set on a scrap piece of pink cardstock with my Versamark Ink and then embossed it with the pink embossing powder. I then freehand cut it out using my Cutter Bee Scissors. I layered the pieces on using foam tape and then added the three Michaels pearls.
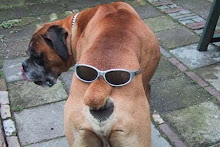
On the back I had to add my boxer dog. It is an old Hero Arts stamp that I bought in the 80's (I think). I stamped it using my Colorbox chalk ink on white cardstock. I punched it out with my Creative Memories circle punch, then punched the larger circle with the pink cardstock. I chalked the edges then added them to my card.
My aunt LOVED this card. She was so happy with it. I was really pleased with how it turned out, and it is so very girly girl!
Products Used from Cutters Creek:
Circut Storybook Cartridge
Brown and Sunshine Yellow Flower Soft & Flower Soft Glue
Cuttlebug Swiss Dots A2 folder
Prism (Bazzill) White Cardstock
Memento Black Ink
Colorbox Chalk Ink
Copic Markers
Inksentials Gel White Pen
Cutter Bee Scissors
3M Foam Tape
Versamark Ink Pad
Glossy Accents
Glue Glider Pro
Beacon 3 in 1 adhesive
Stickles Glitter Glue - Diamond
ScorTape
ScorPal
American Crafts Flowers
Core-dinations Cardstock
Misc Items:
Magnolia Stamp
Making Memories Edge Distressor
Papertrey Ink Stamp Sets
Hero Arts Boxer Dog Stamp
Cardstock - Making Memories, TLC & Misc.
White Cotton Lace
Prima Flowers
Martha Stewart Pearls
Creative Memories Circle Punch
Strand Pearls
Offray Satin Ribbon
Michaels Pearls
Posted by BoxerBrats at 12:00 AM 0 comments
Labels: card making, Circle Punch, Copic Markers, cricut die cuts, Cuttlebug, foam dots, glitter accents, inking, Paper Flowers, Pearls, ribbons, ScorPal, sewing machine stitching, Sizzix Die Cuts, stamping
Sunday, October 19, 2008
Spellbinders Tutorial
Do you ever wonder if you can use a Spellbinders die with your current die cutting machine? I know I have! Here is a great tutorial that was posted on one of my scrapbooking lists. I am sure other can gain some information.
Spellbinders Universal Dies Compatibility
Spellbinders Dies are designed around the Wizard® Embossing & Die
Cutting System and Xcalibur™ Motorized Cutting & Embossing Machine.
However, it has been found that they do have limited compatibility
with other systems.
CuttleBug™ by Provocraft®
This machine is capable of cutting and embossing any Spellbinders
Die. You will need Spellbinders Tan Embossing Mat to emboss in
CuttleBug™ machine.
Cutting Sandwich - stack from bottom up
A Plate
C Plate
Spellbinders Die (cutting side up) that means the side with the
ridges
paper or card stock
B Plate
Run through CuttleBug™ machine
Embossing Sandwich - stack from bottom up
*Remove C Plate for embossing sandwich
Place A Plate on bottom
Leave die face up on A plate with die cut still in the die.
Place one Spellbinders Tan Embossing Mat on top of the die.
Use 2 or 3 pieces of card stock to shim.
*Cautionary note: using more than 3 pieces of card stock to shim
CuttleBug Embossing sandwich will result in B Plate breakage.
When using Spellbinders Edgeabilities card making dies, shim with
only 2 pieces of card stock.
Place two acrylic B Plates on top of sandwich and run through
CuttleBug machine to emboss Spellbinders die cuts.
Turn die over and use like a stencil with inks and chalks for added
detail.
Big Shot™ by Ellison Design® (Blue)
This machine is capable of cutting and embossing any Spellbinders
Die. You will need Spellbinders White Spacer Plate and Tan Embossing
Mat to cut & emboss in the Big Shot Machine.
Cutting Sandwich - stack from bottom up
Place the Big Shots™ thick white mat down first.
Place one Spellbinders White Spacer Plate onto the thick white mat.
Place Spellbinders Die, cutting side up (that would mean the side
with the ridges) onto the white space plate.
Place paper over die.
Plate two Big Shot acrylic mats over paper and roll thru the Big
Shots™ machine.
Embossing Sandwich - stack from bottom up
Remove the Spellbinders Spacer Plate while leaving the die in place.
Place Spellbinders Tan Embossing Mat over the paper and die.
Place one Big Shot acrylic mat on top of Tan Embossing Mat and roll
thru Big Shot™ machine.
Turn die over and use like a stencil with inks & chalks for added
detail.
Big Shot™ by Ellison-Sizzix® (Black & Pink)
Big Kick™ by Sizzix®
This machine is capable of cutting & embossing any Spellbinders Die.
You will need Spellbinders two Tan Embossing Mats to cut and emboss
in the Big Shot™ machine.
Cutting Sandwich - sack from bottom up
Place large platform down first with all tabs closed.
Place Spellbinders die dace up, that would mean ridges or bumpy side
up.
Place card stock on Spellbinders die.
Place two Big Shot™ acrylic mats on top of card stock.
Roll through Big Shot™ machine to die cut shape.
Embossing Sandwich - stack from bottom up
After cutting, remove acrylic mats from card stock and die. Leave the
Spellbinders die in place with paper die cut out still in the die on
the multi-purpose platform.
Plate TWO Spellbinders Tan Embossing Mats on top of die.
With one piece of 12" x 6" card stock tri-fold for a shim and place
on top of the Tan Embossing Mats.
Place ONE Big Shot™ acrylic plate on top and run thru the Big Shot™
machine.
*NOTE: This sandwich combination used to cut and emboss Spellbinders
Dies in the black & pink Big Shot™ may also be used in the Big Kick™
by Sizzix.®
Zip'eMate™ by Accucut®
This machine is capable of cutting and embossing any Spellbinders Die.
Use a Spellbinders Die in the ZEM:
Place a Spellbinders Die on ZEM'S platform, blade side up.
Place paper over die and cut in the same manner as with Zip'eCuts.
After cut, do not remove the die or the paper from the platform.
Place ZEM's Embossing Foam over paper and with the ZEM's Embossing
Mat, roll through again to emboss the die-cut.
Original Sizzix® Press
Ellison® manufactures the Sizzix® System Converter. You will need to
use the system converter along with Spellbinders Spacer Plate and Tan
Embossing Mat to cut and emboss Spellbinders Dies.
Cut Spellbinders Dies in the Sizzix® Machine
Place the Sizzix® System Converter into the Sizzix® Machine.
On the Cutting Pad, place paper to be cut, then Spellbinders Die,
ridges down.
Place the Spellbinders Spacer Place over the Spellbinders Die.
Use a 12" x 6" piece of card stock and trifold to use as a shim.
Place ship on top of Spellbinders Spacer Plate.
Push through Sizzix® Machine to cut.
Emboss Spellbinders in the Sizzix Machine:
After cutting Die in Sizzix® Machine, remove paper shim and spacer
plate.
Leave paper die cut in the die.
Turn over Spellbinders Tan Embossing Mat on top of Spellbinders Die.
Place paper shim on top of Tan Embossing Mat.
Push through Sizzix® Machine to emboss the Spellbinders Die.
NOTE: It may take several presses to cut larger Spellbinders Dies.
Revolution™ by QuicKutz®
This machine may be used to cut and emboss Spellbinders dies.
Cutting with Spellbinder Dies:
Place die onto Revolution™ platform (cut side up).
Place paper or card stock on top of die.
Place acrylic cutting mat on top of die.
Roll through Revolution™ machine.
Embossing with Spellbinder Dies:
Remove acrylic cutting mat.
Leave die in place with die cut still inside.
Place Spellbinders Tan Embossing Pad on top of die.
Place Acrylic embossing mat on top of tan pad.
Roll through Revolution™ machine.
Posted by BoxerBrats at 4:57 PM 0 comments
Labels: Big Kick, Big Shot, Cuttlebug, Sizzix, Sizzix Die Cuts, spellbinders, tips n tricks


